How to use the NEXX-WLW
Mini WIFI Modbus RTU-TCP Gateway Router
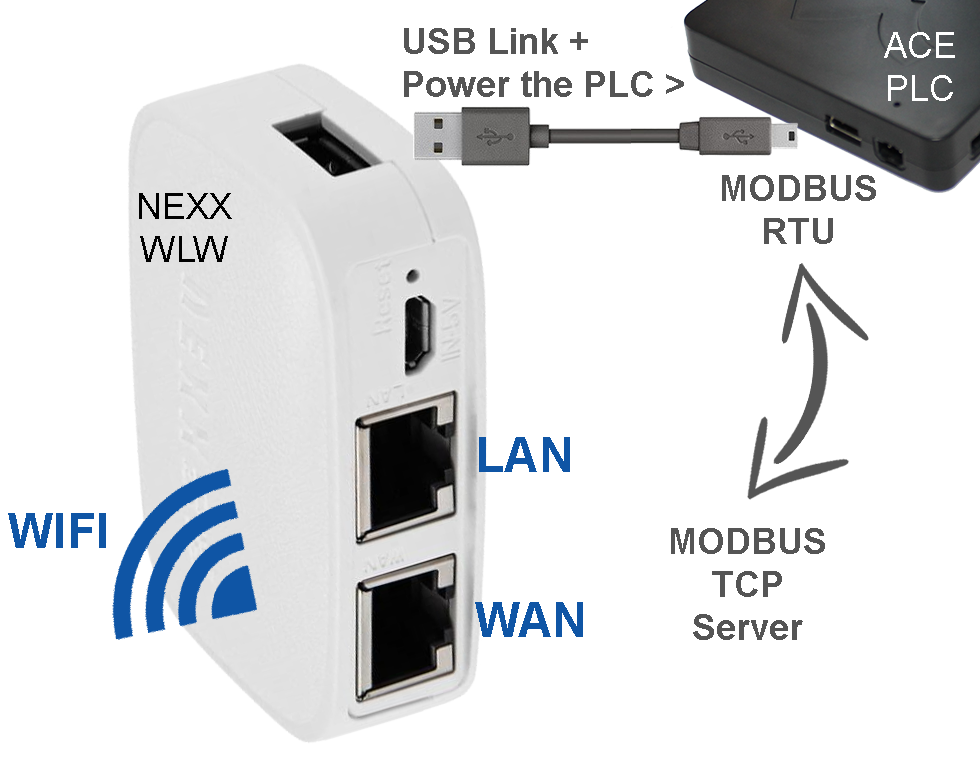
Access to your ACE PLC via Modbus-TCP with your NEXX-WLW

Note:
For your tests you can use:
- Modbus Doctor a Windows Modbus Master software tool.
- Modbus Viewer or Pool Modbus Free the Android Modbus tools.
- Also this small HMI on Android : Virtuino Modbus
Important
- Always switch on your NEXX-WLW Modbus gateway AFTER connecting your ACE PLC
- Never “Reset to defaults / Perform reset” NEXX-WLW Modbus gateway
- Information: Network > Interfaces : GREEN/RED colors = Firewall Settings (not CONNECTED/DISCONNECTED)
- Don’t forget: If you shutdow (OFF) your NEXX-WLW router then you shutdow (OFF) your ACE PLC if it powered by its USB port
- See with your security systems administrator for a safe configuration

Via its LAN RJ45 port connected to your network:
Connect the NEXX-WLW to:
- the ACE PLC with the mini-USB cable supplied
- your Ethernet network (or PC) with a RJ45 cable (LAN)
- the power supply with the micro-USB DC/DC converter cable
- ACE PLC is powered by the NEXX-WLW via its USB port (except the ACE 7096)
Your ACE PLC is available via Modbus-TCP at the IP addresse http://192.168.1.1 (by default) and Ethernet port 502
You can also connect to the network configuration web pages: Login=root, password=root
Via the network configuration web pages, you can change: Password, Interfaces LAN/WAN, Wifi, DHCP, DNS, Hostnames, Static Routes, Firewall,..

Directly via the WIFI access point of the NEXX-WLW:
Disconnect the LAN port (RJ45)
Connect the NEXX-WLW to:
- the ACE PLC with the mini-USB cable supplied
- the power supply with the micro-USB DC/DC converter cable
- ACE PLC is powered by the NEXX-WLW via its USB port (except the ACE 7096)
Connect your PC, Tablet, Smartphone,.. (Modbus-TCP Client) to:
- the WIFI access point “NEXX-WLW”
- Your PC, Tablet, Smartphone,… must be in DHCP mode.
Your ACE PLC is available via Modbus-TCP at the default IP addresse http://192.168.1.1 and Ethernet port 502
You can disconnect from the LAN port (RJ45)
You can also connect to the network configuration web pages: Login=root, password=root
Via the network configuration web pages, you can change: Password, Interfaces, Wifi, DHCP, DNS, Hostnames, Static Routes, Firewall,..
Via its WIFI connection connected to your WIFI network:
First, you must be connected to the network configuration web pages of the NEXX-WLW.
See ” Via its LAN RJ45 port connected to your network ” above ^
In the network configuration web pages of the NEXX-WLW:
- In Network > Wireless/Wifi : Click on [ Scan ]
- [ Join Network ] you want to join
- Enter the passphrase/password if exist
- Let the name of the new network (wwan)
- Select a GREEN firewall-zone configuration (lan) and [ Submit ]
- [ Save & Apply ] the “Device Configuration” and “Interface Configuration” page
- In Network > Interfaces check the new IP address on WWAN interface
Your ACE-PLC is available via Modbus-TCP at the new IP address and Ethernet port 502 (192.168.111.19 in our example on your right), which is automatically provided by the other DHCP server
You can disconnect from the LAN port (RJ45)
You can also connect to the network configuration web pages: Login=root, password=root
Via the network configuration web pages, you can change: Password, Interfaces, Wifi, DHCP, DNS, Hostnames, Static Routes, Firewall,..


How to connect several NEXX-WLW together
You can simply request an archive from us and [Upload archive] in System > Backup/Flash Firmware > “Restore backup”.
Then change its LAN IP address (192.168.1.1 by default)
or follow this steps (especially if you have already configured something in your NEXX):
First, connect the LAN port of the NEXX-WLW to a network with a DHCP server.
You must also be able to see which new IP address will have the NEXX-WLW.
In the network configuration web pages (http://192.168.1.1 by default) of the NEXX-WLW:

In Network > Interfaces: Click on [Edit] of the LAN network
- General Setup > Protocol > Chose “DHCP Client” > Click on [Switch protocole] then [Save & Apply]
Connect to the new IP adresse provide by your DHCP Server. (Its name is “Wifi” or “WTxxxx”)
In Network > Interfaces: Click on [Edit] of the LAN network
- Physical Settings >
- Check “creates a bridge over specified interface(s)”
- Check “VLAN Interface: eth0.1”, “VLAN Interface: eth0.2” and “Wireless Network” then [Save & Apply]
- In Network > Interfaces: Click on [Edit] of the WAN network
- Physical Settings >
- Check “creates a bridge over specified interface(s)”
- Uncheck all Interface then [Save & Apply]
- Physical Settings >
- In Network > Interfaces: Click on [Delete] of the WAN6 network
If you want, now you can come back to fix the IP address of the local network:
In Network > Interfaces: Click on [Edit] of the LAN network
- General Setup > Protocol > Chose “Static address” > Click on [Switch protocole] then [Save & Apply]
- Enter your new fix IP address and netmask then [Save & Apply]
<!> After, never plug LAN + WAN (2*RJ45) at the same time to the same network!


